In this post I’m going to show you a workaround to an issue with SharePoint Designer 2013 workflows in correctly creating a list folder.
Scenario
We have a custom list and we need to dynamically add folders to it through a SharePoint Designer 2013 workflow.

Why
A first question could be:
Why on earth would you need to create a folder in a list? Folders are intended for libraries and files!
There are scenarios when you need to have folders in your list, one of this is to manage permissions at a finer level than the list level, avoiding having to set unique permissions for each list item.
A second question could be:
Why on earth do you need to create folders with a workflow?
There could be scenarios in which folders need to be created dynamically in reaction to some event.
Problem
A list folder is simply a special type of list item.
So it seems quite simple… In the workflow use the “Create List Item” action and set its content type to “Folder”. Yes, it works! The folder is created!
But wait… Clicking on the folder an ugly system name appears in the breadcrumbs (ID_.000)… Oh no! What’s that?!?

This happens because there is a mismatch between the title of the folder that we can set in the workflow and its name that is assigned automatically (respectively “Folder 1” and “66_.000” in the example above).
Unfortunately we can’t set the name of a list folder directly using the create or update list item workflow actions.
Solution
We can use the SharePoint REST API to change the list folder name after having created it.
Now we only need to know which particular property of the list folder sets its name…
We can find that by inspecting the folder properties through a rest call via a browser like this:
https://site/_api/web/lists/getbytitle('listname')/items(ID)/FieldValuesAsText

You can see that value “ID_.000” is hold by the field “FileLeafRef”.
So now we need to update this field of our newly created folder using REST.
Let’s see how to do that in detail…
Steps
1. Get the list item type
To get the list item type we need to use the SharePoint REST API via a browser like this:
https://site/_api/web/lists/getbytitle('listtitle')
and get the value for the “d:ListItemEntityTypeFullName” element.
In the example below the list item type is “SP.Data.TestFolderListListItem”

2. Create the headers dictionary
We must build a dictionary to store some headers, specifically the following ones:
Accept: application/json;odata=verbose
Content-Type: application/json;odata=verbose
Content-Length: <length of post body>
X-HTTP-Method: MERGE
If-Match: *

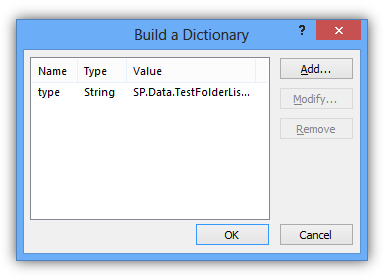
3. Create the metadata dictionary
Next we need to create a dictionary to store our metadata.
This dictionary will contain only one entry for the list item type we’ve obtained previously:
type: SP.Data.TestFolderListListItem
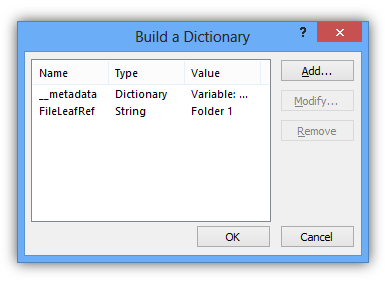
4. Create the data dictionary
Next, we need one more dictionary that will contain our request data.
The dictionary must have an entry with key “__metadata” (note the double underscore before the “metadata” string) with its value set to the previously created metadata dictionary.
We also need to add another entry in the data dictionary with its key set to “FileLeafRef”.
__metadata: <metadata dictionary>
 FileLeafRef: Folder 1
5. Call the SharePoint REST service
Finally, we are ready to call the SharePoint REST service to update our folder name field.
To do this we need to insert the “Call HTTP Web Service” action in our workflow.
The action url must be constructed dynamically to point to the newly created folder like this:
https://site/_api/web/lists/getbytitle('listtitle')/items(n)

The action verb must be set to POST.

Set the request headers to the headers dictionary.
Set the request content to the data dictionary.

Conclusion
This is how the complete workflow should look like:

Now we can publish our workflow and run it. Once it is over we’ll have our folder correctly created with its title and name matching.


Good article. I have a question though:
How can we create a list item in a folder via SharePoint 2013 REST API?
LikeLike
Hi Asim, good question! It is not so straightforward but it is still possibile. I’ll show you how to do that in my next post. For now I can anticipate that we are going to use the listdata.svc service. Stay tuned! 🙂
LikeLike
Hi Asim.
Here is the post I promised you:
LikeLike
the https://site/_api/web/lists/getbytitle('listtitle‘)/items(n) does not seem to accept a Guid as input only works with the Itemid? and even if i change the REST call to a filter GUID eq xx that works in browser it still returns bad request and dont update the folder name
LikeLike
Hi Carsten. Yes, the “n” placeholder in the rest request stands for the folder id not the guid.
LikeLike
I need create workflow in visual studio, can you convert this solution for visual studio workflow?
LikeLike
Ok Nguyen, I will consider the possibility of writing a post about it.
LikeLike
Maria: Very helpful article! I’m trying to create a folder in a library in another site. The REST API should let me do this, but I’m having trouble (keep getting ResponseCode=Unauthorized). I have given the workflow elevated permissions and put the Web Service Call in an App Step in my workflow, but still having problem. Would love to see a version of this post that covers doing that.
Thanks!
LikeLike
Hi JimH,
Have you also granted elevated permissions to the workflow in the destination site or only in the site where you have defined it?
LikeLike
Hi All, does anyone know how to move an item into a folder?
I created an item and just want to move to a newly created folder. Any ideas?
thank you
LikeLike