In this post I’m going to show you how to approve a list item in a SharePoint Designer 2013 workflow even though the “Set Content Approval Status” built-in action is no longer available in SharePoint 2013 On-Premises.
Note: the issue this post is about has been solved in Sharepoint 2013 Online (Office 365).
Scenario
We have a custom list that requires content approval for submitted items and we need to automatically approve them when they are created using a SharePoint Designer 2013 workflow.

Problem
It seems quite simple, like in a SharePoint 2010 workflow there should be a built-in action to do this… but unfortunately this is not the case. In a SharePoint Designer 2013 workflow there is no such action as the old and dear “Set Content Approval Status”.
So we need to find a different way to achive the same result and as always with SharePoint 2013, the REST API comes to our rescue.
Solution
We can use the SharePoint REST API to update a list item and set its approval status.
Now we only need to know which particular property of the item sets its approval status…
We can find that by inspecting the item properties through a rest call via a browser like this:
https://site/_api/web/lists/getbytitle('listname')/items(ID)

You can see that the only property that could do our job is the one called “OData__ModerationStatus” (note the double underscore before the “ModerationStatus” string).
The possibile values for this property are the following:
- Approved: 0
- Rejected: 1
- Pending: 2
So now we need to update this field.
Let’s see how to do that in detail…
Steps
1. Get the list item type
To get the list item type we need to use the SharePoint REST API via a browser like this:
https://site/_api/web/lists/getbytitle('listtitle')
and get the value for the “d:ListItemEntityTypeFullName” element.
In the example below the list item type is “SP.Data.Test_x0020_ListListItem” (the “_x0020_” string replaces the space inside the list name).

2. Create the headers dictionary
We must build a dictionary to store some headers, specifically the following ones:
Accept: application/json;odata=verbose
Content-Type: application/json;odata=verbose
Content-Length: <length of post body>
X-HTTP-Method: MERGE
If-Match: *

3. Create the metadata dictionary
Next we need to create a dictionary to store our metadata.
This dictionary will contain only one entry for the list item type we’ve obtained previously:
type: SP.Data.Test_x0020_ListListItem

4. Create the data dictionary
Next, we need one more dictionary that will contain our request data.
The dictionary must have an entry with key “__metadata” (note the double underscore before the “metadata” string) with its value set to the previously created metadata dictionary.
We also need to add another entry in the data dictionary with its key set to “OData__ModerationStatus” and its value set to 0 (Approved).
__metadata: <metadata dictionary>
 OData__ModerationStatus: 0

5. Call the SharePoint REST service
Finally, we are ready to call the SharePoint REST service to update our item approval status.
To do this we need to insert the “Call HTTP Web Service” action in our workflow.
Put it inside an App Step to make sure the REST call is executed with elevated privileges.
To see how to enable the use of App Steps in your workflow and give it elevated privileges see this article.
To see pending items in the same web of the workflow you need to follow the above procedure with Scope=”http://sharepoint/content/sitecollection/web”.
To see pending items in the same site collection of the workflow but in a different web you need to follow the above procedure with Scope=”http://sharepoint/content/sitecollection”.
The action url must be constructed dynamically to point to the current item like this:
https://site/_api/web/lists/getbytitle('listtitle')/items(n)

The action verb must be set to POST.

Set the request headers to the headers dictionary.
Set the request content to the data dictionary.

6. Change workflow default settings
At this point it is very very important to uncheck the “Automatically update the workflow status to the current stage name” option, otherwise during the workflow execution the item will be updated and its approval status reset to “Pending”.
We also set our workflow to start automatically when an item is created.

Conclusion
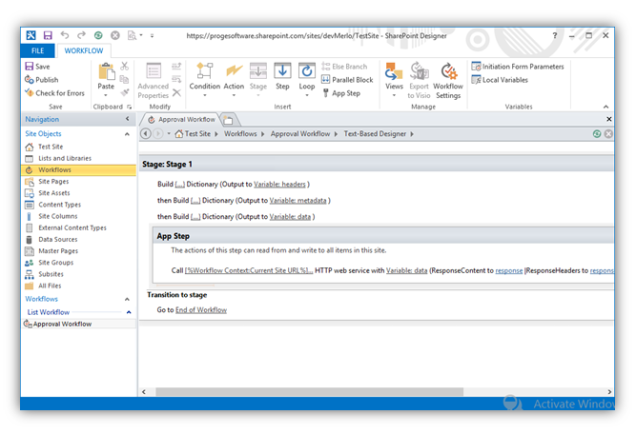
This is how the complete workflow should look like:
Now we can publish it and see that when we create a new item the workflow will start automatically and correctly approve it.


I am getting this error in the workflow. HTTP 404 {“error”:{“code”:”-1, System.ArgumentException”,”message”:{“lang”:”en-US”,”value”:”Item does not exist. It may have been deleted by another user.”}}} . Any idea what I am doing wrong
LikeLike
Hi Keith.
To see pending items in the same web of the workflow you need to use an app step following this procedure (with Scope=”http://sharepoint/content/sitecollection/web”) :
https://msdn.microsoft.com/en-us/library/office/jj822159.aspx.
To see pending items in the same site collection of the workflow but in a different web you need to use an app step following the same procedure as the above but with Scope=”http://sharepoint/content/sitecollection”.
LikeLiked by 1 person
I may have figured it out. I needed to add a dictionary item X-RequestDigest that is set to the digestvalue. if its ok to post the location, here is where I got the info from.
https://blog.appliedis.com/2014/10/09/sharepoint-designer-2013-workflow-working-with-web-services/ otherwise remove from my response. thanks.
LikeLike
I think I may have figured it out. I needed to add a dictionary item X-RequestDigest and set it to the digest value. if its ok to post , here is where I got the info from https://blog.appliedis.com/2014/10/09/sharepoint-designer-2013-workflow-working-with-web-services/. if not please remove. Thanks , for your post, it was a big help
LikeLike
Hi Keith.
Please, try to follow exactly the steps described in my post without any changes… The example provided has been thoroughly tested and works perfectly. I build many workflows like that during my daily activity and I can tell you that there is no need to add the X-RequestDigest header inside a workflow context. That header is only needed when building REST requests using javascript.
To see pending items in the same web of the workflow you need to use an app step following this procedure (with Scope=”http://sharepoint/content/sitecollection/web”) :
https://msdn.microsoft.com/en-us/library/office/jj822159.aspx.
To see pending items in the same site collection of the workflow but in a different web you need to use an app step following the same procedure as the above but with Scope=”http://sharepoint/content/sitecollection”.
Let me know and thank you very much for your comments.
LikeLike
Hello,
I’ve followed your steps but it didn’t work out. all i did get was an error message:
RequestorId: a3d3a09e-daaf-e4ec-0000-000000000000. Details: An unhandled exception occurred during the execution of the workflow instance. Exception details: System.ApplicationException: HTTP 404 {“error”:{“code”:”-1, System.ArgumentException”,”message”:{“lang”:”en-US”,”value”:”Item does not exist. It may have been deleted by another user.”}}} {“Transfer-Encoding”:[“chunked”],”X-SharePointHealthScore”:[“0″],”SPClientServiceRequestDuration”:[“42″],”SPRequestGuid”:[“a3d3a09e-daaf-e4ec-a7b6-173760533ba7″],”request-id”:[“a3d3a09e-daaf-e4ec-a7b6-173760533ba7″],”X-FRAME-OPTIONS”:[“SAMEORIGIN”],”MicrosoftSharePointTeamServices”:[“15.0.0.4805″],”X-Content-Type-Options”:[“nosniff”],”X-MS-InvokeApp”:[“1; RequireReadOnly”],”Cache-Control”:[“max-age=0, private”],”Date”:[“Thu, 10 Nov 2016 15:29:04 GMT”],”Server”:[“Microsoft-IIS\/8.5″],”X-AspNet-Version”:[“4.0.30319″],”X-Powered-By”:[“ASP.NET”]} at Microsoft.Activities.Hosting.Runtime.Subroutine`1.SubroutineChild.Execute(CodeActivityContext context) at System.Activities.CodeActivity.InternalExecute(ActivityInstance instance, ActivityExecutor executor, BookmarkManager bookmarkManager) at System.Activities.Runtime.ActivityExecutor.ExecuteActivityWorkItem.ExecuteBody(ActivityExecutor executor, BookmarkManager bookmarkManager, Location resultLocation)
LikeLike
Have you put the rest call in an app step? You need to give elevated privileges to the workflow in order to see pending items.
LikeLike
Yes, I Did. The actual solution for my problem was to give full control to the workflow app. And it worked like a charm.
I followed instructions given here: https://msdn.microsoft.com/en-us/library/office/jj822159.aspx
LikeLike
Yes, of course.
You need to give elevated privileges to the workflow (full control).
LikeLike
i didn’t get any error but there is no result of workflow on my list . i have to explain that one of my list is in top level and the second one is in subsite may have any relation to this or not?
LikeLike
Hi Rose.
To see pending items in the same web of the workflow you need to use an app step following this procedure (with Scope=”http://sharepoint/content/sitecollection/web”) :
https://msdn.microsoft.com/en-us/library/office/jj822159.aspx.
To see pending items in the same site collection of the workflow but in a different web you need to use an app step following the same procedure as the above but with Scope=”http://sharepoint/content/sitecollection”.
LikeLike